If we talk about Android, there is no such built-in screen recording feature in it, although there are several third-party applications available on Play Store but they fail to record mic audio. Now talking about the iPhone, this feature comes pre-installed in the iOS and you can use it from the control center directly.
Some iPhone users have complained that they didn’t find any screen recording button in their control center. This is no big issue and it can be fixed easily. You just have to enable screen recording feature in your control center settings. This guide will show you how to do it. Apart from that, we will also discuss how you can do screen recording on your iPhone with mic audio.
Table of Contents
Enable screen recording on iPhone’s Control Center
The Control Center on iPhone gives access to the various useful features one of which is screen recording. Screen recording isn’t added in Control Center by default, you have to enable it from the Settings manually. To check if it’s already added, simply open the Control Center on your iPhone.
Swipe down from the top-right corner of the screen on iPhone X or later. For iPhone SE, 8 or earlier versions, swipe up the screen from the bottom. As the Control Center opens, look for the screen recording feature (it’s a small dot icon with a circle around it). If you didn’t find it, then you need to enable it first from the control center settings. Here’s how to do that –
- Open the Settings app on your iPhone.
- Scroll down a bit and click Control Center option.
- Under More Controls, Find Screen Recording and click the + (plus) button before it. This will add the screen recording on your Control Center and it will move under Included Controls. That’s it. You have successfully add screen recording on your iPhone in Control Center.
How to Record Screen on iPhone
Once you have added screen recording on Control Center, you can easily record your iPhone’s screen by following these steps –
- Open the Control Center – Swipe down from the top-right corner of the screen (on iPhone X or later). On earlier version, swipe up from the bottom of the screen.
- Tap Screen Recording option – You will find a small dot icon with a circle around it in Control Center (as shown in the below picture). Simply, click on that button and with the count of 1,2 & 3, it will automatically start screen recording.
- Record your iPhone screen – Now do whatever you want to record in your video. The recording will continue in the background. iPhone also records internal audio. Please make sure to hide any personal information while recording the screen such as your bank account details, passwords, PINs, etc.
- Stopping and saving your recorded video – To stop and save your recorded screen video, simply click the red color recording icon at the top-left corner of the screen. Once you click on it, the recording will stop and the video will be saved in Photos app.
- Watch and edit your screen recording – Open the Photos app on your iPhone. You will find your screen recording video at the bottom. Click on it to play. You can also edit it with the built-in video editor of the Photos app.
How to enable Microphone with screen recording on iPhone
You can also enable microphone audio recording with the screen recording on iPhone which isn’t enabled by default. Here’s how you can do that –
- Again open the Control Center on your iPhone.
- Now long-press on the screen recording button.
- Tap on the Microphone button to turn it on.
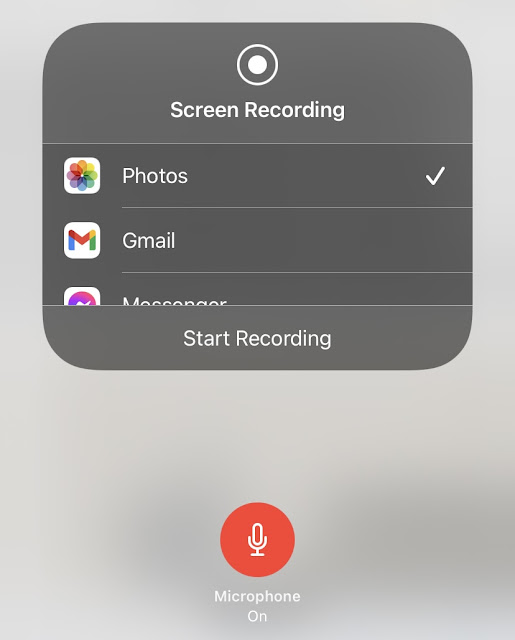
- Now just click on the Start Recording option and record whatever you want with the mic audio also.
So that’s how you can do screen recording on your iPhone with internal audio and mic recording. If you have any questions in your mind related to this topic, feel free to share them in the comment section below. Stay tuned with us for more interesting iPhone guides and don’t forget to share this article with your friends on social media.

