Even if the picture is clicked from a DSLR camera or iPhone, its quality will degrade once it is posted on Facebook. The photo will also look blurry and lose fine details when you will zoom it. Why this happens is because your photos are compressed once you upload them on the Facebook servers.
Facebook will resize and format your photos so as to improve the user experience on its app and website. It is really annoying to see your photos look blurry. If you are also facing this problem, then this guide will show you how to post photos in high-resolution (HD quality) on Facebook without compression.
Table of Contents
1. Enable upload in HD settings on Facebook
There is a feature in Facebook app settings which allows you to upload photos in HD. Here’s how you can enable it –
- Open the Facebook app on your iPhone or Android phone.
- Go to the menu (tap three parallel lines at the top-right corner).
- Expand Settings & Privacy and then click Settings option.

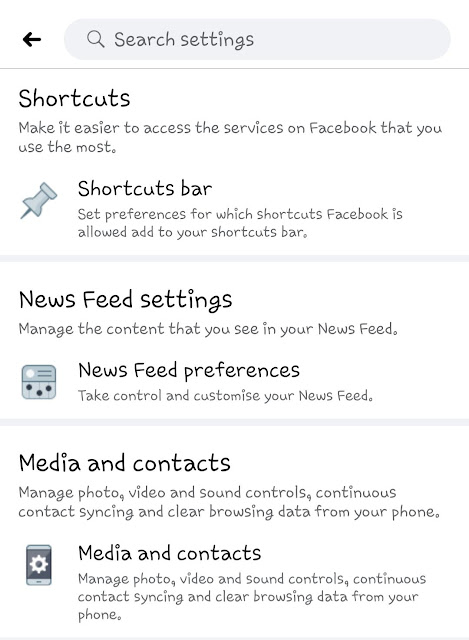
- Scroll down to the bottom and there you will find “Media and contacts“. Click on this option.

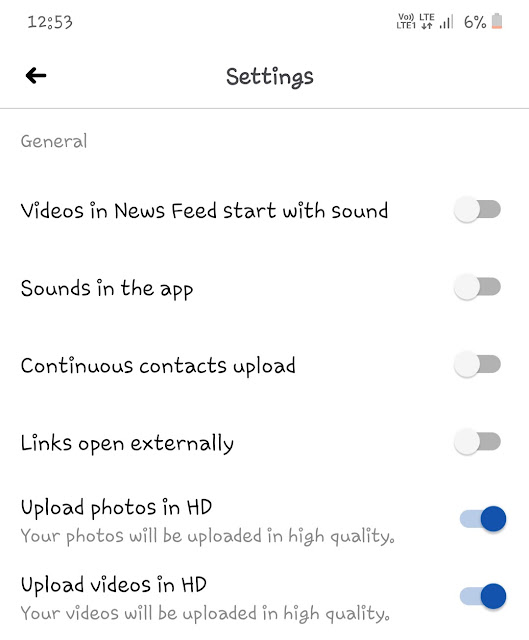
- Now just enable the “Upload photos in HD” button. There is another option for uploading videos in HD. You can also enable it if you want.

From now on, your photos and videos will be uploaded in HD quality on Facebook.
2. Resize your photos before uploading
Facebook will automatically resize your photos once you upload them. This is the main reason why your photos look blurry. If you don’t want Facebook to resize your photos, then you have to resize them before uploading. As mentioned on the Facebook help page, the size of the regular photos should be 2048px wide or smaller and the size of the cover photos should be 851px by 315px.
If you will upload photos will these sizes, Facebook won’t resize them further and thus they will retain their quality. There are so many image-resizing apps available for Android and iPhone that you can find on their app store. If you are on desktop PC, then use Picasa or Lightroom. You can also use online photo resizing tools for this task.
3. Use JPEG images with sRGB color profile
It is also mentioned in the Facebook help page that your photos should be in JPEG format with an sRGB color profile. Most of the pictures that are clicked from your phone will be in JPEG format already. If not, then you can use the image converter app to convert them into the JPEG format.
As for the color profile, this setting is only available in some advanced photo editing software such as Adobe Lightroom. If you have that, then select the sRGB color profile option while saving your photos. After that, you can upload them on Facebook. You will notice that there is no change in their quality.
4. Reduce photos size
The size of the photo is also one of the factors that Facebook considers while compressing the images. If any photo has a very large size, Facebook will apply more compression and thus it will lose its quality. If you want to prevent this, then make sure to reduce the photo size before uploading it on Facebook. Normally, the size of the photos should be between 100 KB to 200 KB. Again, you can use image compressor or editing tools to reduce the size of your photos in this range. Make sure that photos don’t lose their quality in this compression.
Related: How to compress videos on Android
5. Upload photos from Facebook website
We have noticed that photos lose more quality when you upload them from the Facebook app or its mobile website, and especially with the Facebook Lite app. We will recommend you to use the desktop Facebook website. If you are on mobile, then use Facebook with the Desktop site feature on Chrome while uploading photos.
So these are some methods (and tips) that you can use to post pictures on Facebook without losing their quality. Now your photos won’t look blurry as before. If you have more suggestions related to this topic, feel free to share them in the comment section below. You can also ask your personal queries. Make sure to share this tutorial with your friends.


