If we define WordPress in more simple words, it is just a software program (like any other software of the computer) but it works on the web server to run websites. We would be able to use WordPress on Android if we can provide it the right environment it needs to work. It is actually possible to do that.
If you are new to the WordPress system and want to learn it, then the best way to start is by installing it on your Android phone. There is no need to spend your money on buying a web server. Apart from that, you can also play with WordPress and test anything you want without affecting the changes on your real website.
Table of Contents
Steps to setup WordPress website on Android
Before moving to the steps, let’s first list down the things you will need to setup WordPress on Android phone –
- A web server
- MySQL database
- phpMyAdmin
- WordPress software
You can set up these things using an app named KSWEB. This app includes server, PHP, MySQL database, FTP and other web modules. With just a single click, you can create a local server on your Android phone. There are three web servers available: Lighttpd, Apache, and NGINX.
You can download the KSWEB app from the Google Play Store. The trial version of the app provides access to these resources only for a limited time period. You can either upgrade it to the pro version or download the cracked/MOD app of the KSWEB from the internet.
Please make sure that the app version is compatible with your Android version.
Step 1. Setup web server, MySQL, and phpMyAdmin
Launch the KSWEB app on your Android phone once it is installed successfully. You will be asked to give it storage access. After that, the KSWEB app will initiate the installing process to install components such as MySQL, PHP, server, etc.
For installing WordPress, we will be using the Lighttpd server as it comes free in this app. In the Status tab, make sure that the Lighttpd, MySQL, and PHP is active. You can also go to their respective tab and check if the Enable server button is turned on.

For using phpMyAdmin, you have to download some extract components. Simply, go to the Tools tab and click the phpMyAdmin option. After that, the KSWEB app will automatically download, extract, and install the necessary files.

If you go back to the Status, you will see two hosts under the Lighttpd server. Host 0 points to http://localhost:8080/ address. It’s for the server itself. On the other hand, Host 1 points http://localhost:8081/ address. It’s for the phpMyAdmin web interface.
Step 2. Create MySQL database for WordPress
Now we will create a new MySQL database for WordPress. WordPress needs a database to store all necessary website data such as usernames, passwords, posts, pages, comments, and even the website theme and configuration settings.
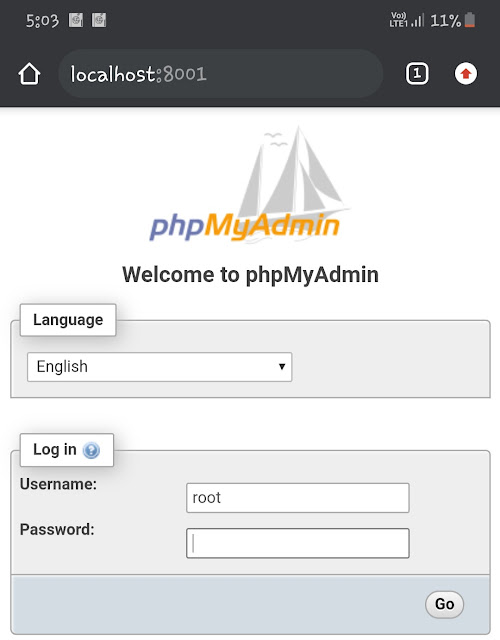
We will create this database using phyMyAdmin. There are two ways you can access it. Either you can directly open http://localhost:8081/ address in any web browser (e.g. Google Chrome) on your Android phone or go to the KSWEB app > Tools and click the phpMyAdmin option.

Now you will see a login page on the phyMyAdmin web interface. The default username is ‘root‘. Leave the password field blank and tap the Go button to continue. Next, click the Databases option at the top. Under the Create database section, enter the database name for your website and then click the Create button.

You can give it any name you want but make sure you remember it later. As in the above picture, we have given it ‘wordpress‘ name.
Step 3. Install WordPress on the server
Your database is ready now. The final step is to install WordPress on the server. You have to download the latest version of WordPress from its official website. It comes in a ZIP file so you have unarchive it. For this task, either you can use the built-in file manager of your phone or any third-party app like ZArchiver.
Next, you have to copy and paste the WordPress folder you have extracted in the htdocs folder on your internal storage. The htdocs folder is set as the default root directory of your server. Once you have placed the WordPress folder there, open Google Chrome or any other web browser and go to http://localhost:8080/wordpress address.
You will see the WordPress installing page now. Select your language and tap the Continue button. Click the Let’s go button on the next page. After that, you have to enter the database connection details –

- Database name – enter the name of the database you have created in the 2nd step. We have named it ‘wordpress’.
- Username – change it to ‘root’
- Password – keep this field blank
There is no need to change the database host and table prefix. Once you have filled these details, tap the Submit button. Congratulations! You’ve completed all the major steps. Now you can run the installation process and continue setting up your WordPress website.
- Also read this tutorial: How to install WordPress locally on your PC
So that’s how you can install a WordPress website on your Android phone by creating a local web server, PHP, and MySQL database. Hope you find this information helpful. Go and try it now. If you face any problem in the above steps, share it with us in the comments below so we can help you out.


