WordPress is just a software which works on web servers. You will be interested to know that it is possible to install WordPress on your computer locally. There are basically 2 things which WordPress needs to operate. It includes a web server and MySQL database.
If you can set up these things, you will be able to install WordPress easily. Now you may ask how it is useful if your website will only work locally on your system. Well, if you are a beginner, you can use it to learn WordPress. You can customize it as you want without worrying about anything.
In this tutorial, we have shared a complete guide to install WordPress website locally on your Windows, Linux, and Mac OS based PC/Laptop. Here are the steps you need to follow –
Table of Contents
Step 1: Setup server and MySQL database using XAMPP
XAMPP is a free and open-source application which allows you to use web services on your computer. It consists of Apache, PHP, MySQL, and Perl. By using XAMPP on your computer, you can setup a server and database for your WordPress website.
XAMPP is available for all operating systems including Windows, Mac, and Linux in both 32-bit and 64-bit variants. You can download XAMPP from its official website. After downloading it, open the exe file. You will be asked by your operating system to start the installer. Just click the Yes button to continue.
In the installer screen, tap the Next button. After that, you will be asked to choose which components in the XAMPP you want to install. As for WordPress, you only need Apache server, MySQL and phpMyAdmin. Make sure to select these components and unselect others that you don’t need.
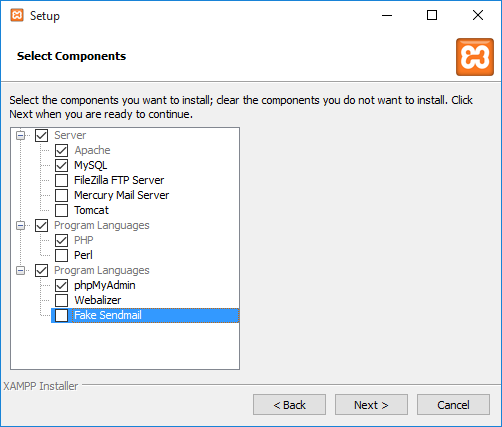
Click the Next button to continue. Then you will be asked to choose the folder where you want to install XAMPP. There is no need to change the folder location. Simply, click Next until it starts the installation process. Once it’s finished, tap the Finish button to close the installer.
Now start the XAMPP program that you have just installed on your computer. To set up the Apache server and MySQL database, click the START button next to the Apache and MySQL module. Once it turns into a green color, it means that the module is started.
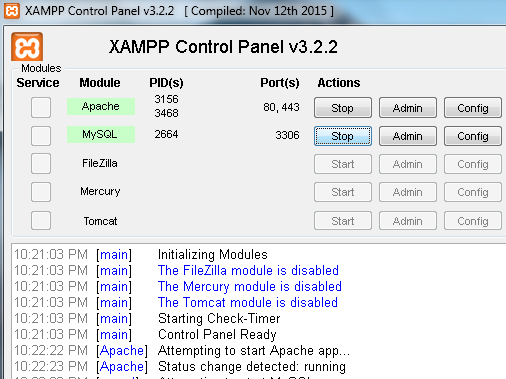
Now if you will open Google Chrome or any other web browser on your computer and visit http://localhost/ address, you will see the web interface of the XAMPP’s Apache server. Congratulations, you have successfully set up your own local server.
Step2: Create a database using phpMyAdmin
The next step is to create a database for the WordPress website. We will use phpMyAdmin for this. Simply, press the Admin button next to the MySQL module on the XAMPP Control Panel. Once you are in phpMyAdmin, click the Databases option.
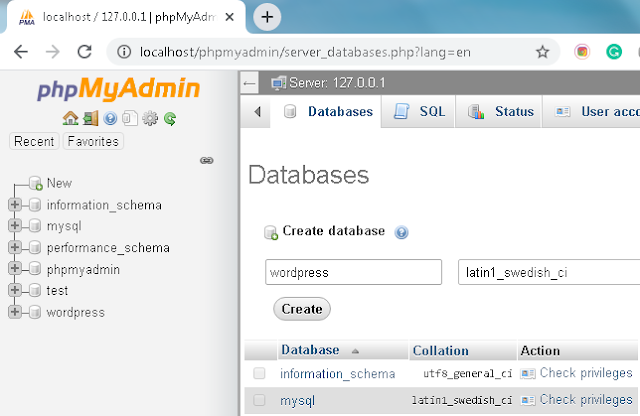
In the Create database section, enter the name of the database and then click the Create button. You can give it any name you want but for this guide, we have named it ‘wordpress‘.
Step 3: Download and add WordPress files
Next, you have to download the latest version of WordPress on your computer. You can download it from its official website. After that, extract the ZIP file. You will see a folder named wordpress in it.
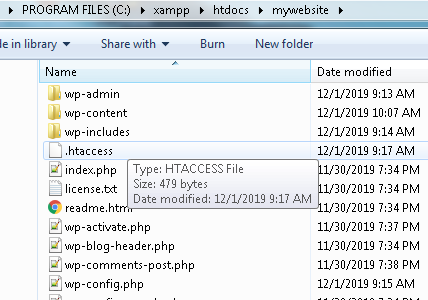
Now go to the folder where you have installed XAMPP. It is located at C://xampp address. There is a sub-folder in it named htdocs. Simply, open that folder. Here you have to create a new folder for your website. You can name it anything you want but don’t add space or special characters in it.
It is just like creating a domain for your website. Let’s name it ‘mywebsite‘ as an example for this guide. After this, just copy and paste all data from the wordpress folder that you have extracted earlier into this folder.
Step 4: Setup your WordPress website
Now you are all set to install WordPress on your computer. Open any web browser (for example, Google Chrome) and visit http://localhost/mywebsite address. Make sure to change ‘mywebsite’ if you have used different folder name in the previous step.
This will open up the WordPress installer page. Choose your language and continue to the next page. Like in the normal WordPress installation, you will be asked to enter your database connection details.
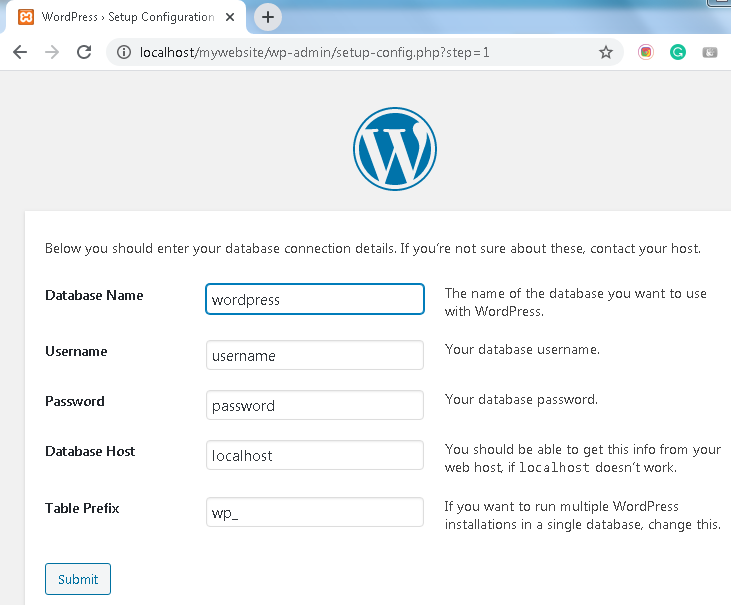
- Database name – Enter the name of the database you have created in phpMyAdmin. We have named it ‘wordpress‘.
- Username – enter ‘root‘ here.
- Password – keep the password field blank
After filling these details, you can complete the rest of the steps to set up your WordPress website like normal. That’s it.
We hope you find this guide helpful to install WordPress on your Windows or Mac OS computer/laptop. If you are stuck anywhere, let us know in the comments below so we can help you to fix your problem. At last, we will recommend you to read another useful tutorial on how to install WordPress on your Android phone.
