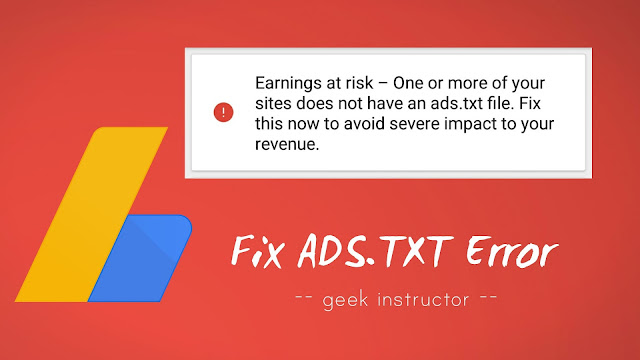
Here is the notice that you will get from the Google AdSense –
Earning at risk: One or more of your sites does not have ads.txt file. Fix this now to avoid severe impact to your revenue.
So what is this ads.txt file and why AdSense wants you to add it on your website? How it can affect your revenue? These are some common questions that you may be interested to know.
This tutorial will explain you everything about ads.txt file. We have also discussed how you can add ads.txt file on your Blogger website/blog and fix this issue on AdSense quickly.
Table of Contents
What is ads.txt file
Ads.txt is a simple text file that allows publishers to authorize who has the ability to sell their ad inventory. In simple words, it contains the information of ad network(s) who are allowed to sell ad space on your website.
The ads in ads.txt stands for “Authorized Digital Sellers“. This is an initiative taken by IAB Tech Lab, and supported by Google AdSense also, in order to prevent counterfeit inventory and make online advertising more transparent.
The ads.txt file is useful for advertisers also. It can help them to verify if a particular website is authorized to place ads from the ad network they are using. Let’s take an example to understand this easily –
Suppose you are an advertiser and you are want to run your ad on a particular website through an ad network. To authenticate if the website owner has allowed that ad network to place ads on their inventory (or ad space), you can check the ads.txt file of that website.
How ads.txt file can affect your AdSense earnings
Some advertisers want to place their ads on those websites only that have the ads.txt file. Now if your website doesn’t contain ads.txt file, those advertisers will be removed from the auction and thus you will suffer a loss in your revenue.
The format of ads.txt file
The ads.txt file should have a separate line for each ad network that is authorized to sell your inventory. There are 4 pieces of data to describe the ad network –
[Domain], [PublisherID], [AccountType], [TagID]
Here’s an example of how it actually looks –
google.com, pub-0000000000000000, DIRECT, f08c47fec0942fa0
- [Domain] – In this field, you have to mention the canonical domain name of the system. In the case of Google AdSense, it is google.com
- [PublisherID] – Here you have to add the publisher ID of your Google AdSense account.
- [AccountType] – If you directly manage your ad account, then you have to add DIRECT value in this field. On the other hand, if you use a third-party ad manager to manage your AdSense account, then you have to add RESELLER value.
- [TagID] – The TagID is used to uniquely identify the advertising system. It is matched with the entity listed in [Domain]. For Google seller accounts, the TagID is f08c47fec0942fa0
If you are using any other ad network also, then add its details separately in a different line. Once after creating the ads.txt file, you have to upload it at the root level of your domain. For example: yourwebsite.com/ads.txt
How to add ads.txt file in Blogger
Unlike WordPress, Blogger doesn’t allow users to directly upload any file on their website directory, but there is a feature in Blogger search preferences settings which allows you to add ads.txt on your blog or custom domain website. Here’s a step-by-step guide –
- Login to your Blogger account and open your blog dashboard.
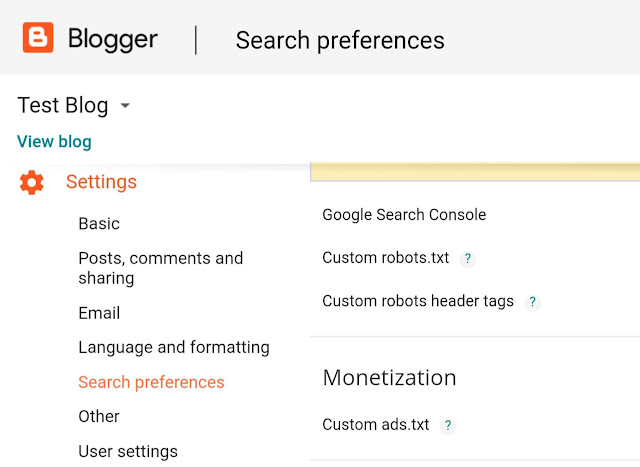
- Now click the Settings option from the left sidebar menu and then go to Search preferences.

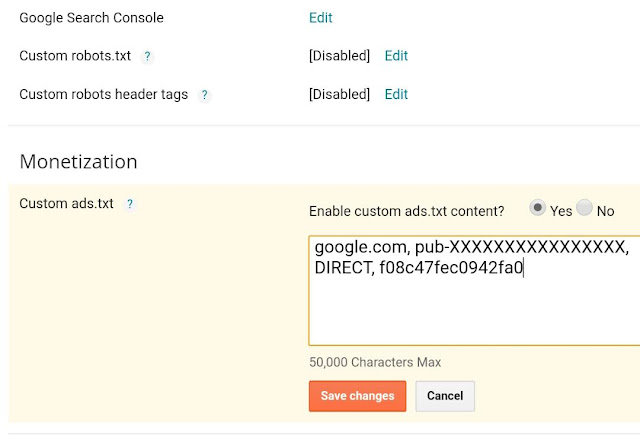
- Under Monetization section, click the edit option next to the Custom ads.txt.

- Now select Yes button to enable it and then add this text in the text editor box –
google.com, pub-XXXXXXXXXXXXXXXX, DIRECT, f08c47fec0942fa0

From the above example, make sure to replace pub-XXXXXXXXXXXXXXXX with your own publisher ID. To find your publisher ID, login to your AdSense account and go to Menu > Settings > Account > Account Information.
Alternatively, you can also find it in the AdSense ad code that you have placed on your website. - Finally, tap the “Save Changes” button. That’s it.
You can view your ads.txt file by adding /ads.txt at the end of your Blogger website like this: https://yourwebsite.com/ads.txt
AdSense still showing ads.txt warning
AdSense will not immediately remove the notice once you have added ads.txt file on your website. It depends on when AdSense crawler will crawl your website. So just wait for some days (this can take up to 1 week).
Now if you are seeing the same ads.txt notice on your AdSense account even after so many days, then there is something wrong you need to fix. First of all, make sure that the ads.txt file is working on your website and you have added your correct publisherID in it.
We have also found an issue in HTTP sites on Blogger. Blogger is automatically redirecting HTTP sites from non-www version to the homepage. For example, if you will visit http://yourwebsite.com/ads.txt, it will redirect to http://www.yourwebsite.com.
This might be the reason why AdSense crawler is unable to access ads.txt file on your website. As of now, the only way to fix this issue is by switching your Blogger site from HTTP to HTTPS. There is no issue of redirecting in HTTPS-enabled sites.
So that’s everything you need to know about ads.txt file. We hope you find this tutorial helpful to add ads.txt file on your Blogger website and fix the AdSense issue. If you are facing any other problem or you want to ask something related to this tutorial, let us know in the comment section below.
I was looking for solution of adding text files, thanks for sharing.