If you want to send large size images to someone via e-mail or any other service, then it would take a lot of time to upload them. Similarly, the recipient would have to wait for a while to download those images if there is a slow internet connection.
We came up with this tutorial to help you reduce the size of images on your Android phone. Here we have shared 3 simple ways to compress images without losing their quality. Let’s first discuss how the size of an image can be reduced.
Table of Contents
How the size of images is reduced
There are two ways you can reduce the size of an image –
- Compress the image – As we all know that an image is made of so many pixels. So when we compress the image, it will reduce the number of pixels it has and thus reducing the size of the image. Compression doesn’t affect image resolution.Let’s take an example of an image which has 10 million pixels. Compression will only reduce the number of pixels, while the height and width size of the image will remain the same. If you will compress at a very high level, the image may lose some details (or quality).
- Resize the image – In this method, the resolution (length or width) of an image is reduced. This will reduce the file size, however, the quality of an image will not be compromised much as long as you don’t resize it to a very small size.Let’s say, you have an image of 1920×1080 resolution. This means that the width of the image is 1920 and the height is 1080. After resizing, the length and width of the image will be changed and it may appear smaller in size. However, pixels will not be reduced in resizing the image.
How to reduce the size of photos on Android
Google Play Store is loaded with so many image compressor apps that can help you to reduce the size of photos on your Android phone. One of the best apps we have found so far is JPEG Image Size Reducer.
This app lets you compress images based on the percentage level or MB/KB up to which you want to reduce the size. Another feature of this app is that it allows you to select multiple images at the same time.
As the name suggests, JPEG Image Size Reducer app can only reduce the size of JPG (or JPEG) images. If you will select any PNG image, it will first ask you convert it to JPG format and then perform any operation.
Anyways, here’s the step-by-step guide which shows you how to reduce the size of photos on your Android phone –
- Download and install JPEG Image Size Reducer app on your phone.
- Open the app and tap the “Load” button to add the photo whose size you want to reduce.

If you want to compress multiple photos at the same time, move to the Multiple tab and click Actions > Add images from inbuilt gallery (or file manager).

- Once you have added the image(s), tap the “Actions” button.
- Now If you want to compress image(s) based on the percentage level, click the “Reduce to % of original” option and then select the percentage.
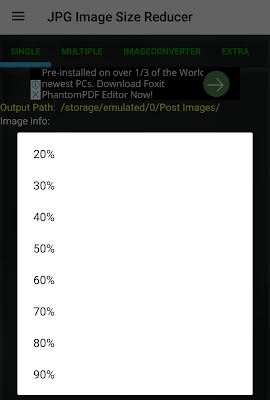
On the other hand, if you want to reduce the size of the image(s) to certain KB/MB, then click the “Reduce to KB/MB” option and select the size. You can also choose “Custom KB” option to mention the size manually.
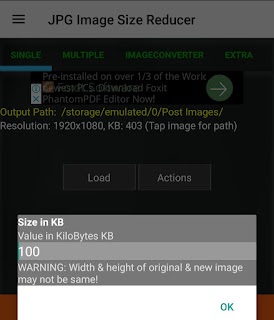
Note: If you don’t want to lose the quality of the photo(s), then select the maximum percentage level or KB/MB size.
The default output directory where the compressed images are saved is /storage/emulated/0. If you want to change this location, go to Actions > Select output directory.
Compress images using Lit Photo app
Lit Photo is another popular image compressor app for Android. You can compress, resize and crop photos in this app. It also has a feature which allows you to delete the original photos once you have compressed them.
- Download and install Lit Photo app on your Android phone.
- Open it and select “Compress Photos” or “Resize Photos” option.

- Next, select the image(s) whose size want to reduce.
- If you are compressing the image(s), you would see a screen as shown in the below picture. Here you can select the Compress Quality.
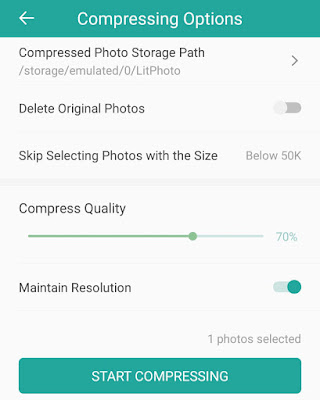
Make sure that “Maintain Resolution” button is enabled if you don’t want to reduce the resolution (height or width) of the image(s). After this, tap the “Compress” button.
- For resizing, there are 2 modes available: Percentage and Pixel. In percentage, you can select the % level up to which you want to resize the photos.
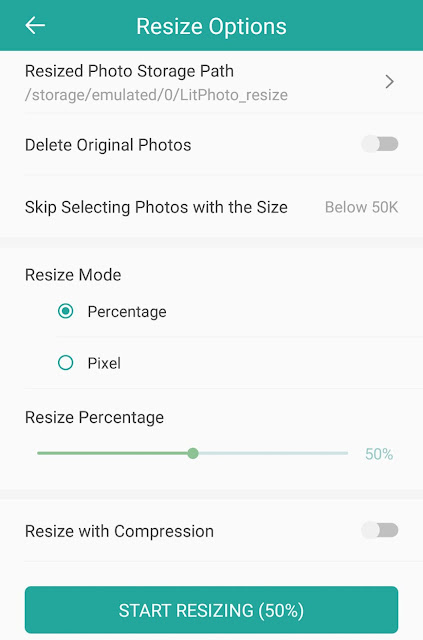
Alternatively, you can select Pixel option and specify the height or width of the image manually. If you don’t want to lose the quality of the image(s), make sure that “Resize with compression” is disabled. Finally, click the “Start Resizing” button. That’s it.
Reduce the size of images using online tool
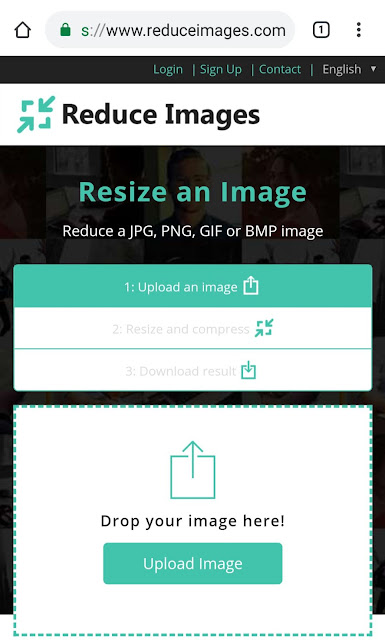
If you don’t want to install any third-party app on your Android phone or you just want to compress only a few images, then you can use an online tool for this task. Reduce Images is one of the most popular online image compressor tools.
All you need to do is, go to Reduce Images website and upload the photo whose size you want to reduce. You would be asked to change the default settings of resize and compress. Finally, tap the Resize button and then download the compressed image.
So these are 3 simple methods that can easily help you to reduce the size of images on your Android phone. If you know any other better solution or you want to ask something related to this tutorial, feel free to share it in the comment section below.


