Google will replace all your old HTTP links with the new HTTPS links by itself. But sometimes, it will index both HTTP and HTTPS versions of your website. This can cause duplicate content issues which will affect your website SEO.

If you are also facing this problem with your Blogger blog, this tutorial will guide you how to fix the duplicate content issue and index the correct HTTPS links of your Blogger website in Google.
Table of Contents
Indexing HTTPS Blogger Blog in Google
There are 3 things you need to do to tell Google that you have moved your Blogger website from HTTP to HTTPS –
1. Add HTTPS site to Google Webmasters
You have to add a new property of the HTTPS version of Blogger blog in Google Webmaster. Follow this step-by-step guide –
- First, go to Google Webmaster and login to your account.
- Click “Add a new property” button in the Search Console.

- Now type the exact HTTPS URL of your blog ending with “/” symbol. For example: https://www.your-blog-name.com/

- After this, tap “Add” button. If you have already verified your website in Google Webmasters, you will be moved to the Dashboard of your new property.
- Now you have to add a sitemap of your Blogger blog. Simply click “Sitemap” button on the Dashboard or go to Crawl > Sitemaps.
- Next, tap “Add/Test Sitemap” button, type sitemap.xml in the URL field, and then click “Submit” button. Similarly, add sitemap-pages.xml to index pages of your Blogger blog.

It may take some time (up to 1 week) to crawl and index all webpages of your website.
2. Enable 301 HTTP to HTTPS redirect
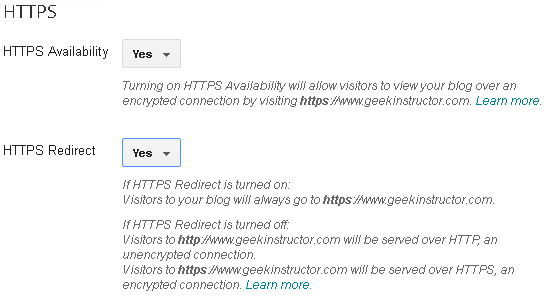
This is the most important step to redirect your site visitors and Google from HTTP to HTTPS. As you may already know that 301 is a permanent redirect, so it won’t affect your website SEO.
Here’s a step-by-step guide to enable 301 redirects on your Blogger blog –
- Login to your Blogger Dashboard.
- Go to Settings > Basic.
- From the HTTPS Redirect drop-down, select “Yes” option and save the changes. That’s it.

Next time, when Google will crawl the HTTP version of your website, it will be redirected to the new HTTPS version. The 301 permanent redirect will guide Google that you have moved your Blogger blog from HTTP to HTTPS permanently.
3. Check HTTPS canonical tag
The canonical tag is another important thing that Google considers while indexing any webpage. If the canonical tags of your website are still pointing to the old HTTP URLs, then it will cause duplicate content issues.
Blogger will automatically change the canonical tags of your blog after switching to HTTPS. You can check them by viewing the source code of your website (search for rel=’canonical’ tag).
If there is no canonical tag in your Blogger blog, follow these steps to add them –
- Login to your Blogger Dashboard and go to Template > Edit HTML.
- Click anywhere in the template editor and press CTRL+F to open the search box.
- Now type <head> and press enter button to search it.
- Just below the <head> tag, add the following code:
<b:include data='blog' name='all-head-content'/>
- Finally, click “Save template” button to save the changes. That’s it.
Once you have done all these things, Google will automatically move all your Blogger website links from HTTP to HTTPS. It may take some time to reflect the changes, so just sit back and wait.
- Also read: How to fix mixed content errors in Blogger
We hope you find this helpful. If you are facing any problem, feel free to share it in the comment section below.


