Google Docs is a popular web-based word processor that is used by internet users to write and share documents online. If you have found yourself in a situation where you want to save an image from the Docs document, you would have noticed that Google Docs doesn’t provide the facility to download images to your device.
When there is no built-in feature available, there are always some workarounds to help you. In this article, we are going to share 8 different methods that can help you to save images from the document on Google Docs. You can download a single image individually or all images in bulk. This guide has been made for all devices including Windows PC, Mac, Android, and iOS.
Table of Contents
How to save Docs images on PC
There is not just one but multiple methods to save images from Google Docs on PC. Some of them can download all images from the document in bulk while others can be used to save only a single image at a time.
Method 1: Publish docs to the web
Google Docs has a feature to publish the document to the web. This will generate a regular web link to the document that you can paste in the browser. You can then download selected images from Docs like you normally download other images on the web. Here’s a step-by-step guide for this method –
- Visit the Google Docs website in any browser on your PC and open the document from where you want to download the image(s).
- Click the File option in the upper-left corner of the document and then go to Share > Publish to the web from the menu.
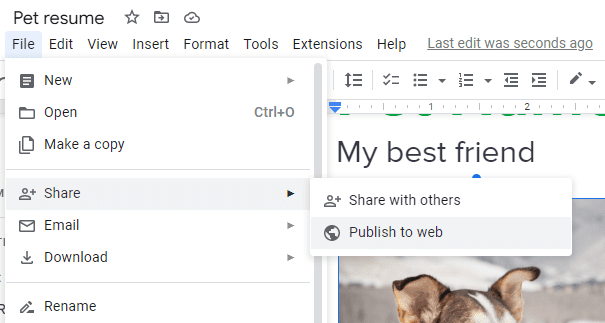
- Now a pop-up box will appear on your screen where you will see the link generated for your document under the Link heading. If the link isn’t generated, tap the Publish button. After that, copy the URL to your clipboard and open it in a new tab.

- Now find the image you want to download, right-click on it, and then choose Save as option. Choose the location where you want to save it on your system and give a file name to the image (optional). Finally, tap the Save button and this will download the Docs image to your PC successfully.

The downside of this method is that it can download only one image at a time. You need to repeat the same process multiple times for each image. There are some add-ons or Chrome extensions that you can use to download multiple images from the web in bulk.
Method 2: Download Docs as Web Page
There is a facility to download your document as a web page on Google Docs. This will create a ZIP archive that will contain all the images of your document. Unlike the previous method, this method can be used to extract multiple images in bulk. Follow these simple steps –
- Open the Google Docs document on your PC.
- Click the File option in the upper-left corner of the screen.
- Now go to Download and choose Web Page (.html, zipped) option. From the Save as window, choose the location where you want to save the file and tap the Save button.

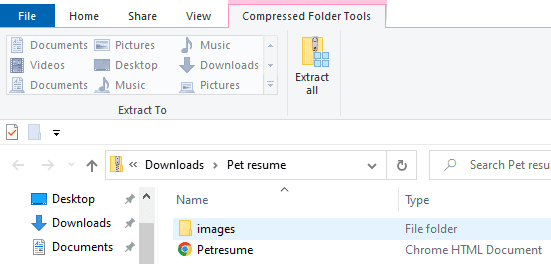
- Navigate to the folder where you have downloaded the ZIP archive. Extract the ZIP file using WinZip or any other ZIP extractor tool on your PC.
- Open the extracted folder. Inside that, you will find a sub-folder named images. This folder will have all the images of your Docs document.
Method 3: Save Docs image to Google Keep
Google has connected both its Google Keep and Google Docs with each other. You can directly transfer images from your Docs document to Google Keep with just a few clicks. Later, you can download those images to your PC using the save as feature on the right-click action. Here’s what you need to do –
Open the document from where you want to download the image. Select the image and right-click on it. Choose Save to Keep option from the menu.
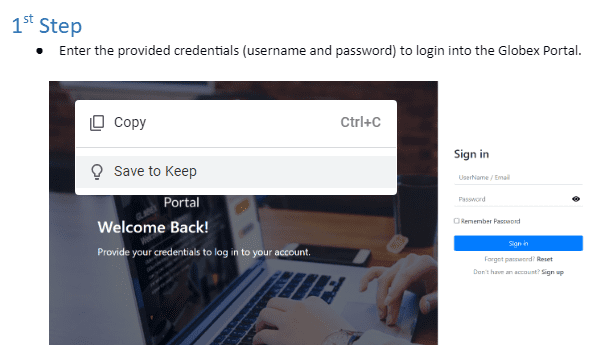
This will transfer the image to your Google Keep and it will be opened in a split screen on the right sidebar. Open the note where your image is saved. Now right-click on the image and choose Save as option. Give a suitable name to the image and save it at a desired location on your PC.
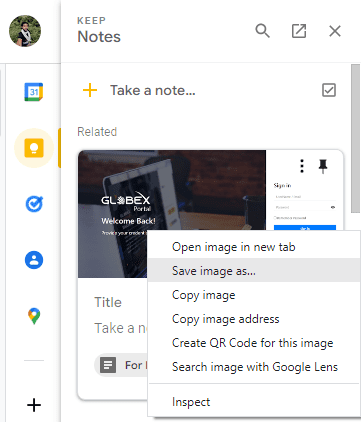
This method is one of the fastest ways to save images from Google Docs. However, the major disadvantage is that you can only download one image at a time. You have to repeat the same process for every image.
Method 4: Download Docs to Word
This is yet another method to save images from Google Docs but it’s not convenient so we would not recommend you to use it. In this method, you have to first download the Google Docs document to Word. For that, click the File option from the menu at the top, go to Download and then select Microsoft Word (.docx) option. Once the document has been downloaded to your PC, open it in Microsoft Word. Now right-click on the image you want to download and use the Save as option to save it at your desired location.
How to save Docs images on Android
Saving Docs images on Android is pretty much similar to PC. The methods are the same but the steps and screenshots will vary. You can use the following methods –
Method 5: Download Docs as Web Page
- Open the document in the Google Docs app on your Android phone.
- Click the menu button (three-dot) in the upper right corner of the screen and then choose Share & export.

- Next, click on the Save As option and select Web Page (.html, zipped) format.
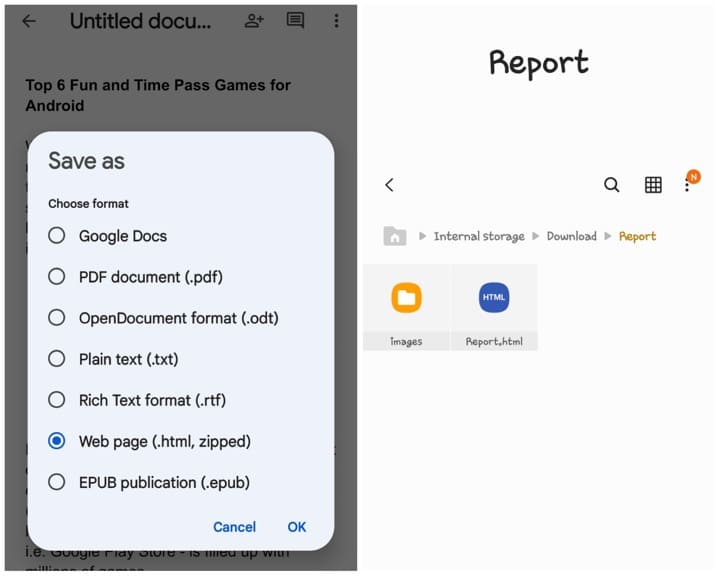
- This will save the document as a ZIP archive to your Google Drive. Open the Drive app on your phone and find the ZIP file with the same name as your Docs document. Tap three-dot icon next to the document name and then select the Download option.
- You can find the downloaded ZIP file in the Downloads folder on your internal storage. Use the built-in file manager or any third-party app to extract the ZIP archive. Next, open the folder where you have extracted the ZIP file. You will find all the images of your Google Docs document inside this folder.
Method 6: Open document in Chrome
In this method, we will make the document shareable via link and then open it in the Chrome browser. You can use the browser’s built-in feature to save the image(s) to your gallery. Here’s a step-by-step guide for this method –
- Open the document in the Docs app on your Android phone and tap the three-dot icon at the top-right corner.
- Now go to Share & export and enable the Link sharing button. This will create a shareable link of your document and it will be copied to your clipboard automatically.
- Open the Chrome browser and paste the link of the document in the URL tab.
- Once the document is loaded, find the image you want to download. Tap and hold the image and then select the Download image option. That’s it. You can find the downloaded image in your phone gallery.
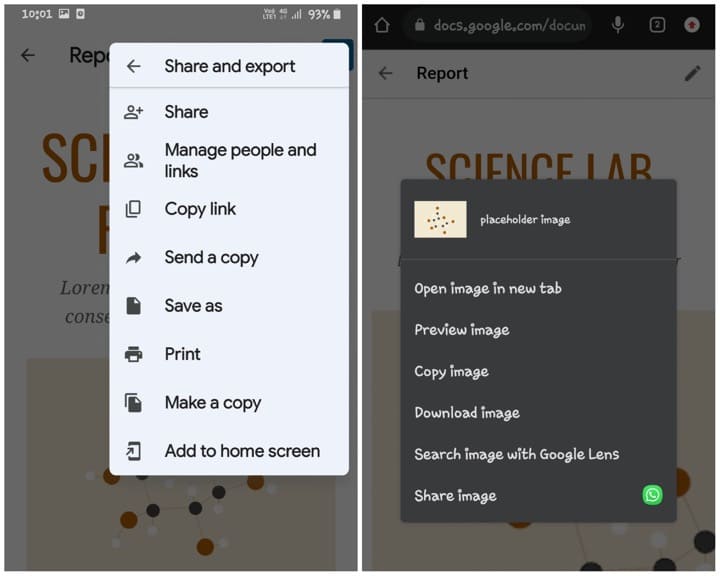
Note: You will be able to create a shareable link only for the documents you’ve created. If someone has sent you a document, you need to ask the author to enable the link sharing. In that case, you can directly copy the document link and open it in a web browser.
How to save Docs images on iPhone
iPhone has completely different methods to download images from Google Docs. The previous methods don’t work on iOS. You can use the following methods –
Method 7: Use drag and drop feature on iOS 15 or above
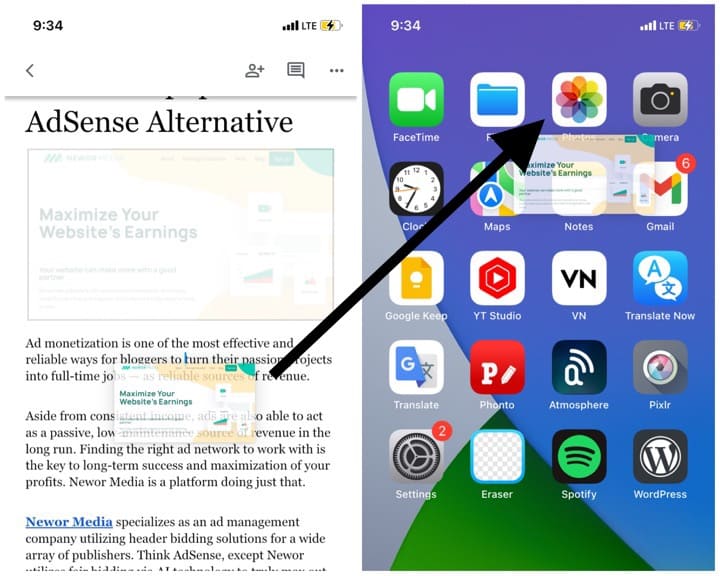
iOS 15 has added a new drag and drop feature to download images to the Photos app. This feature can be used to save images from Google Docs as well. Here’s what you need to do –
Open the document from where you want to save the image in the Docs app on your iPhone. Tap and hold the image and drag it from its position. Keep holding the image with your finger. Use a finger from another hand to perform a swipe up action. It will take you to the home screen of your iPhone. Now open the Photos app and drop the image to your Library by releasing your first finger.
Method 8: Copy Docs image to the Notes app
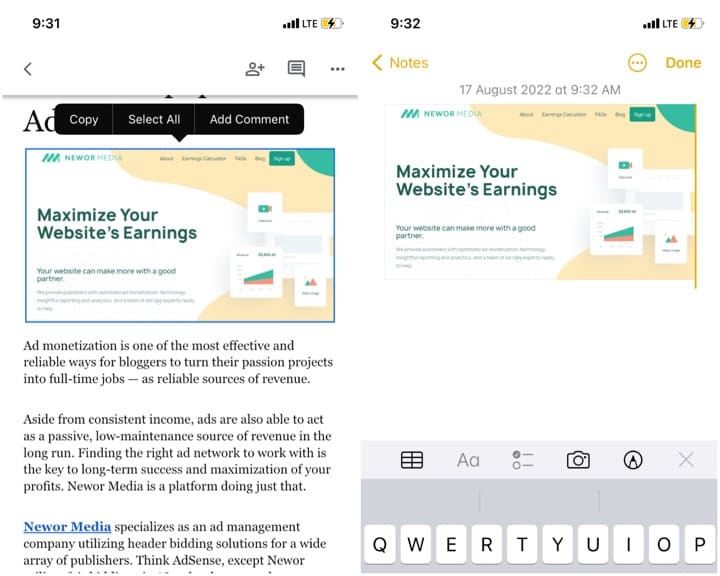
Open the document in the Docs app and navigate to the image you want to download. Tap on the image to select it and then choose Copy option. Now open the Notes app on your iPhone and create a new note. Tap and hold the blank area to reveal the clipboard options and then select the Paste option. This will copy the image to your Notes app. Now click on the image to open it in full screen and then select the share icon at the bottom-right corner of the screen. From the Share Sheet, choose the Save Image option and this will save the image to your Photos Library.
Universal method: Take a screenshot
One of the easiest ways to extract an image from Google Docs is to take a screenshot. This is a universal method which works on all devices and operating systems including Android, iPhone, iPad, Windows, MacOS, and others.
Take a screenshot on Android – Press and hold the volume down and power off buttons simultaneously. You will hear a click sound and see a flash on your screen indicating that the screenshot has been taken. Open the Gallery app and you will see it there. Use the built-in editor of the Gallery app to crop the screenshot.
Take a screenshot on iPhone – Press the side button and the volume up button at the same time. Once you see the white screen flash, release both the buttons. You will see the preview of your screenshot at the bottom-right corner. Tap on this preview and it will open the editor screen. Here you can crop the screenshot. Finally, save the image to the Photos app.
Take a screenshot on Windows – Visit the Google Docs website and open the docs file. Navigate to the image you want to download. Press the Print Screen (PrtScr) key on your keyboard. Now open the Paint app and select the Paste option or press CTRL+V keyboard shortcut key. Select the Crop option from the toolbar at the top and then crop the image from the screenshot. Finally, go to File > Save as and then save the image at your desired location.
Take a screenshot on Mac – Use this shortcut key combination: Shift+Command+4. Drag the cursor to outline the image you want to capture. Alternatively, you can use Shift+Command+3 keyboard shortcut. This will take a screenshot of an entire screen. You can later crop it to get the image.
Frequently asked questions
Google Docs supports various image file types such as JPEG, PNG, GIF, and BMP. You can insert these image formats directly into your Google Docs document. To insert an image, click on “Insert” in the top menu, then select “Image” and upload your image file. Keep in mind that Google Docs may convert the image to its own format (e.g., WebP) for display, but the original format is usually retained.
Google Docs has an Optical Character Recognition (OCR) feature that allows you to extract text from images. First, upload the image to Google Drive that contains the text you wish to extract. Once the image is uploaded, right-click on it and select Open with > Google Docs from the pop-up menu. Google Docs will then perform OCR on the image, extracting the text and inserting it into your document.
While Google Docs provides basic image manipulation options like resizing and cropping, it doesn’t offer advanced image editing features. For more extensive editing, you may need to use external image editing software before uploading images to your Google Docs document.
Final thoughts
So these were some methods that you can use to download images from Google Docs. We have shared methods for all devices and operating systems. If you have any questions in your mind, feel free to share them in the comments below. Stay tuned with our website for more interesting how-to tutorials and guides.
Read other similar articles:
- How to Download Photos from Threads
- How to Download Photos from Instagram
- How to Compress Images on Android Without Losing Quality
- How to Convert PNG Images to JPG on Android
- How to Edit Transparent PNG Images on Android


