There are numerous reasons why you would need to block websites on your Android phone. Maybe you want to set up parental controls to prevent your children from accessing inappropriate websites. Or it could be possible that you want to restrict yourself from using certain sites that you’ve got addicted to. It will help you stay more focused and improve your productivity.

Chrome is the default web browser that comes pre-installed in almost every Android device. If you are looking to block websites in the Chrome browser on Android, you’ve landed on the right web page. You may already know that Chrome doesn’t allow you to block sites directly. Although there are some third-party extensions available on the Chrome Web Store for this task but they only work on the desktop version.
Luckily, we have found some workarounds for the Android Chrome browser that can help you to block a specific website or a group of websites in bulk belonging to a particular category such as adult, social media, shopping or any other. Without further ado, let’s start with the first method!
Table of Contents
Method 1: Block websites on Android using a third-party app
Third-party apps are always there to help you do the impossible tasks that might not be possible otherwise as Android offers very limited features in its settings. In this method, we are going to use an application called BlockSite. This step-by-step guide will show you how to configure this app to block websites on your device –
- Download and install the BlockSite app on your Android phone. This app can be downloaded from the Play Store for free.
- Open the BlockSite app once it’s successfully installed. Read the Terms of Use and Privacy Policy of the app. Tap I Accept button to continue.

- Enable accessibility permission – You will be asked to go to the accessibility settings on your phone and allow BlockSite to prevent you from using certain apps and websites. Tap the Settings button and it will take you to the Accessibility page directly. Find BlockSite under Installed services and turn it on by switching the toggle button. You will get a pop-up box that will describe the permissions you are going to allow to the BlockSite app on your phone. Tap Allow to continue.

- Turn on usage access – This access is required to allow BlockSite to understand your browsing habits. Once you have enabled accessibility permission, you will be taken back to the BlockSite setup screen. Click the Settings button next to the Turn on usage access heading. Find BlockSite and switch on the toggle button to allow usage tracking.
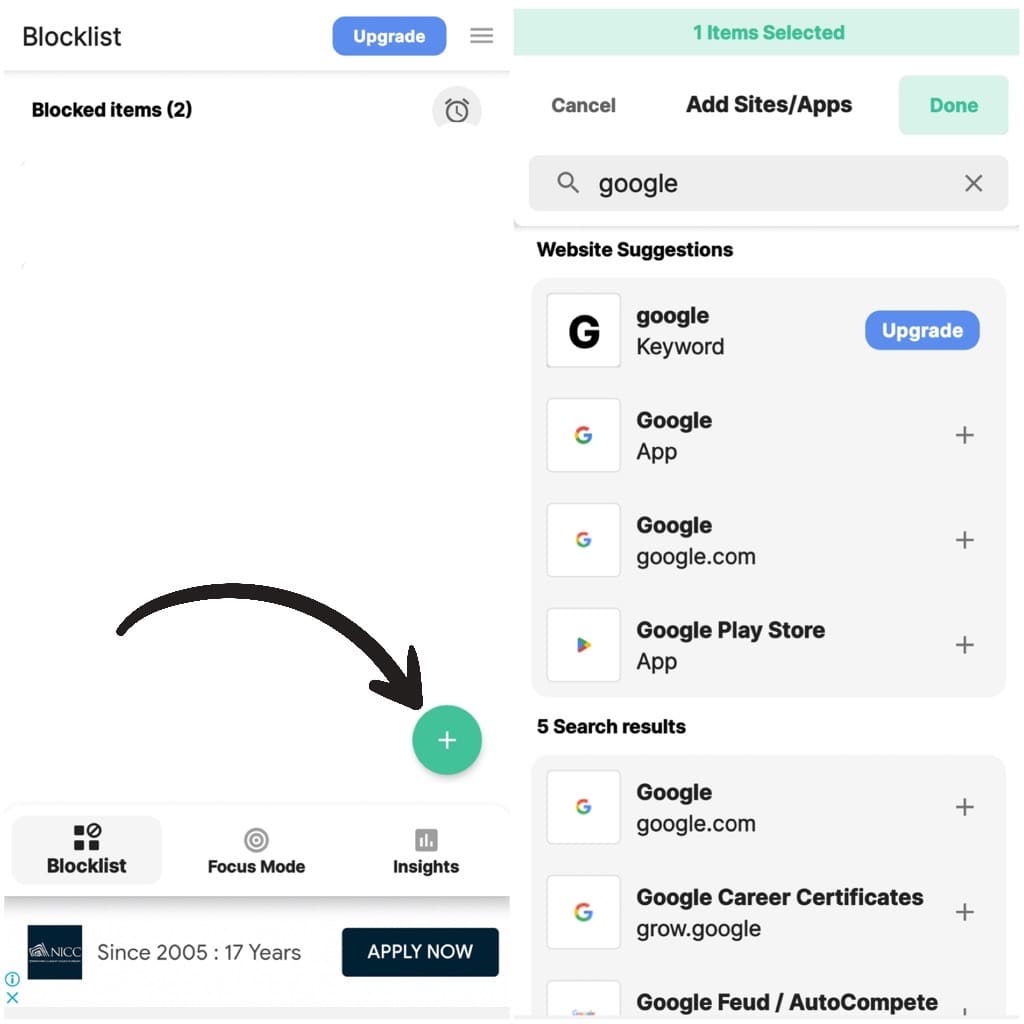
- Add website to the block list – Once you have set up the BlockSite app successfully, tap the add (+) button on the Blocklist tab. Now enter the domain or name on the website you want to block on your Android phone. From the search results, select the particular website you want to block and tap the Done button in the upper right corner. Now you will see the website(s) added to your block list.

- Block websites based on category – After you tap the add (+) button on the BlockList tab, you will see some website categories under the Category Suggestions heading like adult, social, shopping, news, sports, and gambling. Here you can select any category of your choice and it will block all websites belonging to that category at once.

- Test your blocked websites – Now it’s time to test whether your selected websites have been blocked or not. Open the Chrome browser on your Android phone and visit any website you have added to the blocked list. Before the loading finishes, you will get a message on your screen saying that this site is blocked by BlockSite.
This is a universal method that will block your selected websites across all web browsers on your Android device including Chrome, Firefox, Opera, Brave, or any other.
Method 2: Block websites on Android by changing DNS
In this method, we will use an online DNS service provider called NextDNS to block websites for free. You will need to change the DNS address of your device to point it to the new address of the NextDNS service. This method does not require to download any third-party application. Just follow this step-by-step guide –
- Open Chrome browser on your Android phone and visit the nextdns.io website.
- Tap the “Try it now” button. If you are new to this website, you need to create your account. It’s free to create the account. Click Sign up button and it will take you to the Sign up page. Now provide your email address and create a password for your account. Tap the Sign up button to continue.
- Once you are logged in, you will be on the Setup page by default. Slide the menu at the top and click Denylist.

- This is where you need to add all the websites that you want to block on your Android phone and Chrome mobile browser. Enter the web address of the website and add it to the list. You will a small toggle button next to the website name. You can switch it on or off to enable and disable the blocking.
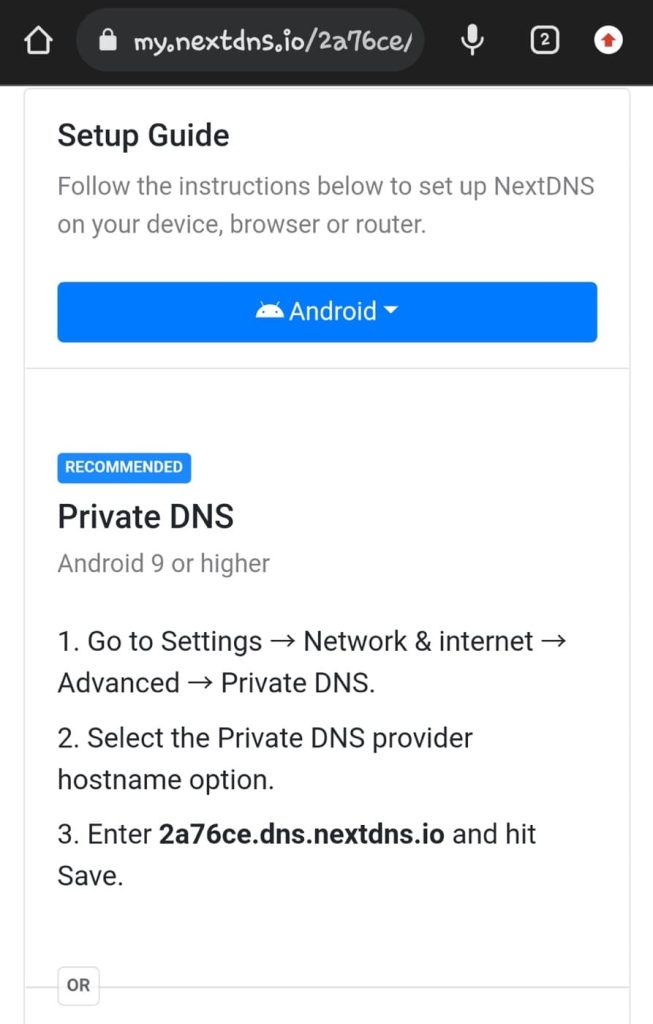
- Now head back to the Setup page and scroll down until you see Setup Guide heading. Make sure that Android is selected. Under Private DNS section, copy the DNS address.

- After this, open the Settings app on your Android phone and look for Private DNS option using the search feature. You will find it manually under ‘Network & Internet’ or ‘Connections’ settings. This may vary depending on your phone model and Android version.
- Next, select the Private DNS provider hostname option. If there you have anything there, then delete it and paste the DNS address you have copied earlier. Tap the Save button to apply the changes. To confirm that this DNS is working, you can check the status under the Setup page.

- Now open the Chrome browser again and try accessing the website you have added to the Denylist. You will get an error message saying “This site can’t be reached”. Voila!

Method 3: Block website’s content on Chrome
Although Chrome does not provide any feature to block websites on Android directly and nor does any third-party extension work on it, there is an alternative feature that can help you to block specific content from the site such as media, notifications, ads and pop-ups. This will make the site partially inaccessible. You can follow these simple steps for this method –
First of all, open the Chrome browser on your Android device and go to the menu (click three dots at the top-right corner). Next, tap the “Settings” option from the menu. Under the Advanced section, choose “Site settings“. Here you will find various controls for the sites you visit on Chrome. You can choose to block ads, notifications, pop-ups, javascript, sound and other content.
Method 4: Block potentially unsafe websites on Chrome
Chrome browser has something called Safe Browsing which protects you from potentially unsafe websites. When this feature is enabled, you will get alerts about malware, fishy extensions, and phishing sites. It’s a great security feature that you should keep enabled on your Chrome browser. Here’s how you can do that –
Open the Chrome browser on your Android phone and click three-dot (menu) in the upper right corner of the screen. From the menu options, choose Settings and then go to “Privacy and Security“. Now here you will find an option named “Safe Browsing“. Just click on it. After that, you can select the level of safe browsing you want to use. There are three options available: Enhanced protection, Standard protection, and No protection.
Enhanced protection is the most advanced safe browsing level. Apart from warning you about potentially risky sites and downloads, it will also warn you about your password leakage in a data breach. Note that Google will collect additional data from your device when this option is selected. This data will be used by Google for the assessment of security threats and online protection.
Standard protection provides the normal level of safe browsing. It will warn you about potential unsafe websites and you can choose to get warned about leaked passwords. The last option is No protection. When this option is selected, Safe browsing remains inactive. If you have to choose between standard and enhanced protection, we will recommend you to go with the latter one.
Method 5: Enable Safe Search on Google
Safe Search is another great feature by Google that filters explicit content from your search results such as pornography, violence, and other offensive content. This feature is associated with the Google website and not the Chrome browser. You can enable it from the Google settings.
If you want to block websites on your Android phone for parental control, Safe Search would be very helpful to keep your children away from explicit content. Although it does not block websites directly, it does restrict selected sites from appearing in Google search results.
To enable Safe Search, visit the Google website on Chrome and tap the menu button (three horizontal lines) in the upper left corner. After that, click the Settings option from the menu. Once you are on the Search Settings page, find the SafeSearch filters heading and select the Hide explicit contents option.
Frequently asked questions
When you block a website on your Android device using methods like BlockSite or DNS configuration, it becomes difficult for someone to access the blocked site. However, it’s not entirely foolproof. Determined users might still find ways to access blocked websites, such as by using a different browser or VPN.
Yes, you can block all websites on your Android device and only allow access to specific sites by using the “BlockSite” app or similar third-party apps. These apps let you create a whitelist, which is a list of websites that are allowed while blocking access to all other sites.
When you block a website on Android, attempting to access that blocked website will result in an error message that the site is blocked or can’t be reached. The website won’t load, and the user won’t be able to view its content.
To block adult content on Android Chrome browser, you can use a third-party app like “BlockSite”. It allows you to filter and block websites based on categories, including adult content. By setting up the app and selecting the appropriate category, you can prevent adult content from being accessed on your Android device.
The specific steps may vary depending on the app or method you used for blocking websites. If you have blocked a website through the BlockSite app on your Android phone, you can remove the site from the Block List to unblock it. Simply, open the app and go to the Block List. Find the website you want to unblock and remove it. Confirm the action and then test access in your Chrome browser.
Final words
Blocking websites on the Chrome browser has never been this much easier before. Chrome does not provide a built-in blocking feature but thanks to these methods and third-party apps to make this possible. Whether you need to block websites for parental controls or you just want to stay focus and improve your productivity, you can use any of these methods in the Chrome browser on your Android phone to restrict yourself from accessing certain websites. If you have any questions in your mind, feel free to share them in the comments below.
Read other similar articles:
- 10 Things You Should Avoid Searching on Google
- How to Block Ads in Safari on iPhone
- How to Unblock Geo-Restricted Content on Netflix
- Fix Telegram Web – This site can’t be reached issue
- How to Disable Site Notifications on Chrome


